Configuration
The Configuration tab (Components > RSComments!, then click the "Options" button) is the place where general component settings can be adjusted. For better navigation, these have been divided into 7 tabs:
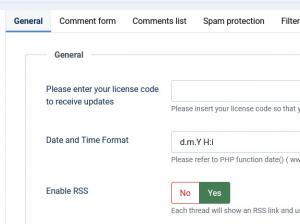
General
- Please enter your license code to receive updates: the license code required to receive updates. This is available in the rsjoomla.com > My Downloads area, after you have registered a domain.
- Date and Time Format: A mask used to display the date. This is based on the PHP date masks.
- Enable RSS: Enabling this option will display the RSS icon.
- Load Bootstrap: No / Yes
- Load jQuery in backend: No / Yes
- Load jQuery in frontend: No / Yes
- Load font Awesome in frontend: No / Yes
- Load font Awesome in backend: No / Yes
- Store IPs: No / Yes
- Require consent: No / Yes
- Default Modal: choose either Joomla! Bootstrap v2 modal or Magnific Popup when opening frontend modal links.
- Clear cache: No / Yes. This will clear the site cache for pages that have RSComments! on.
- Enable content prepare: No / Yes. Enable this to load content plugin in the comment.
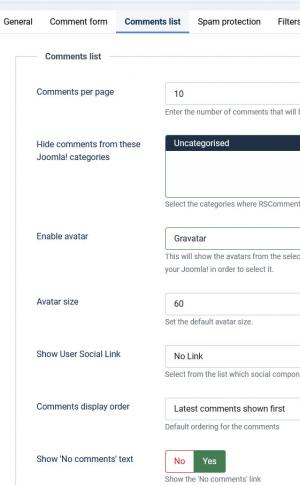
Comments list
- Comments per page: the maximum number of comments that will be displayed on a page
- Hide comments from these Joomla! categories: categories that RSComments! will not be displayed on(press CTRL to select multiple categories)
- Enable avatar: if this option is enabled, the comment will also display a image of the person who has submitted the comment. The avatar can be imported from: Gravatar, Community Builder, JomSocial, Kunena, Fireboard
- Avatar size: set the default size of the avatar
- Show User Social Link: no link, Community Builder, JomSocial. The avatar can be linked to the listed profiles, depending on the installed components.
- Comments display order: Most recent first/last
- Show 'No comments' text: Yes / No - if enabled the text will be displayed if no comments are available
- Enable last edited text: enable this to show when and who edited the comment
- Enable reports: enable this to allow people to report comments
- Enable captcha for reports: before submitting a report, users will be prompted with captcha anti-spam security
- Enable Report notifications: if set to "yes" the a notification email can be sent when a report is submitted
- Report emails: Report notification emails will be sent to these email addresses, emails should be separated by using a comma
- Enable Email notifications: if set to "yes" the a notification email can be sent when a new comment is submitted
- Notification emails: Notification emails will be sent to these email addresses, emails should be separated by using a comma
Captcha
The Captcha tab offers some controls over the anti spam options that can be enabled on your commenting form:
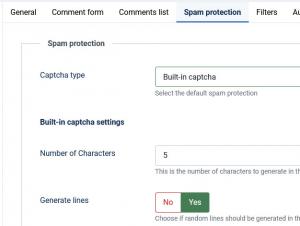
- Spam protection: Built-in captcha / reCaptcha. RSComments! comes by default with a integrated captcha system but, if preferred, it can use reCaptcha
Built-in captcha
- Number of Characters: numerical value. This option allows you to set how many chars the built-in captcha will generate (does not apply if reCaptcha is used)
- Generate lines: if enabled some lines will be added to generated captcha image (built-in) making it harder for some spam boots to pass through
- Case sensitive: the validation of the generated chars will be case sensitive. For example, if the captcha generates "AB" the system will only validate "AB" not "ab"
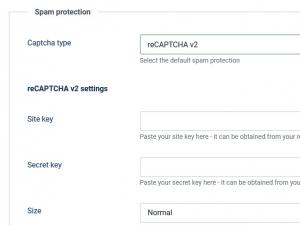
reCAPTCHA v2 Settings
- reCAPTCHA Site Key: you can get this by registering your domain on the Google reCAPTCHA account
- reCAPTCHA Secret Key: you can get this by registering your domain on the reCAPTCHA account
- Size: select the size of the reCaptcha field. Available options are: Normal, Compact and Invisible. If Invisible is selected, a new field will be displayed where you can select the Badge location.
- Badge: select the location of the reCaptcha badge. Available options are: Inline, Bottom Right and Bottom left.
- reCAPTCHA Theme: chose the color theme of the reCAPTCHA widget
- Type (Fallback): chose the type of CAPTCHA to serve
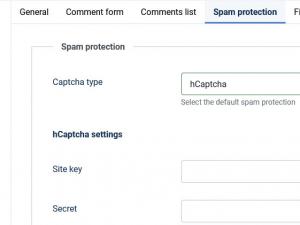
hCaptcha Settings:
- Site Key: You can get this by registering your domain on the hCaptcha account
- Secret Key: You can get this by registering your domain on the hCaptcha account
- Language: Auto (Detected by hCaptcha) / Site (Joomla! language) - Choose the language used for the antispam method.
- Theme: Light / Dark - Choose a visual theme for the field
- Size: Normal / Compact / Invisible - Choose the HTML size attribute for the verification field
You can create an account for this anti-spam solution on the official hCaptcha website.
Filters
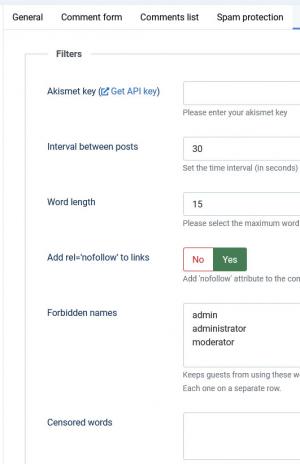
The Filter tab allows you to set what words can be filtered upon posting a comment:
- Akismet key: to use the Akismet comment validation you will require a key. Using the Akismet option will provide some protection against spammers.
- Interval between posts: what time should pass before a new comment can be added by you.
- Word length: the maximum number of chars a word can have. This is useful for preventing the comment to break the layout.
- Hide comment limit: sets the limit of negative votes a comment has before gets automatically hidden, use 0 for no limit
- Add 'nofollow' attribute to the comment links: you can set this attribute to notify the search engines not to pass PageRank to the linked page.
- Forbidden names: the listed names can't be used when filling up the comment form(each on a new line).
- Censored words: a list of the words that will be censored. Each has to be separated by comma (,)
- Word replacement: the censored words(each on a new line) can be replaced with the configured chars. For example: *****
- Block users: listed users are not able to comment(each on a new line).
- Block IP's: listed IP's are not able to comment(each on a new line).
Automations
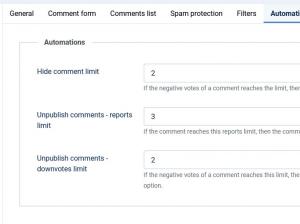
The Automations tab allows you to control the state of a comment based on its negative votes / reports.
- Hide comment limit: If the negative votes of a comment reaches the limit, then the comment will be hidden.
- Unpublish comments - reports limit: If the comment reaches this reports limit, then the comment will be unpublished. Leave it empty to disable this option.
- Unpublish comments - downvotes limit: If the negative votes of a comment reaches this limit, the comment will be unpublished. Leave it empty to disable this option.
6 persons found this article helpful.
You Should Also Read
What does RSComments! do? HOT |
Adjusting the component's look and feel |
Overview |

Comment form
The Giphy API Key can be retrieved by logging in the Giphy Developers dashboard. Here, create an SDK App and after configuring it, the API key will be generated. Keep in mind that this would be a Beta API Key, which is limited to 50 results. If you want more results to be returned, you will need to apply for 'Production', you'll find more information on this topic on their documentation linked above.