Plugin - Stripe (Create custom order forms)
The RSForm!Pro Stripe Payment Integration Plugin allows you to add a new payment method to the existing Payment Package of RSForm!Pro.
Downloading and Installing the plugin
Download
You can download the plugin by logging with your purchase user, then head to Downloads > My Downloads > RSForm!Pro - view all plugins and modules > RSForm!Pro Files > Plugins > "Stripe Plugin".
Install
In the backend area go to the Extensions > Manager > Install page, and install the plugin. Next thing is to publish the plugin from Extensions > Plug-in Manager, search for the "System - RSForm! Pro Stripe Plugin" plugin and publish it.
Configuring the plugin
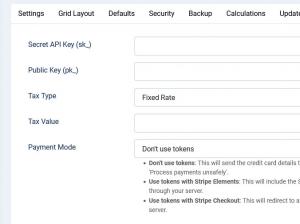
Configuring the Stripe payment gateway can be done from Components > RSForm!Pro > Configuration > Stripe tab:
- Secret API Key (sk_): this should be located in your Stripe account settings (more details).
- Public Key (pk_): this should be located in your Stripe account settings (more details).
- Tax Type: Percent (%) / Fixed Rate
- Tax Value: Amount of tax. Total amount of the transaction must include this amount.
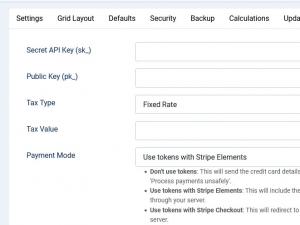
- Payment Mode: Don't use tokens / Use Tokens with Stripe Elements / Use tokens with Stripe Checkout (Legacy) / Use tokens with Stripe Checkout (New)
For Live payments a SSL certificate is required for your website.
Payment modes explained
Use tokens with Stripe elements
When enabled, this will include the Stripe js library which replaces your credit card fields with Stripe fields, sending all credit card data directly to Stripe instead of passing it through your server.
Use tokens with Stripe Checkout
If chosen, this option will redirect to a new page where users will need to fill in their credit cards details. All the data is sent to Stripe and tokenized, instead of passing through your server. There are two versions: Legacy and New
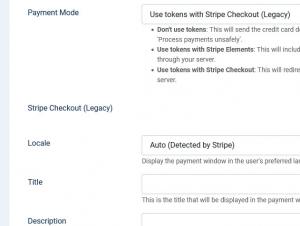
Legacy version
The legacy version will prompt new fields that needs to be filled in, such as:
- Locale: Auto (Detected by Stripe) / Site (Joomla! language). The payment window will be displayed in the user's preferred language, if there is any available. By default, English will be used.
- Title: Type here the title that will be displayed in the payment window.
- Description: Add the description that will be displayed along with the title, in the payment window.
- Image URL: A square image will be displayed representing your product/brand. You can use a relative or absolute URL and the recommended minimum size is 128x128px. The supported image types are: .gif / .jpeg / .png
- Validate Billing ZIP Code:Yes / No. If enabled, the billing ZIP code will be validated.
- Collect Billing Address:Yes / No. Specify whether the billing address should be collected in the payment window.
- Collect Billing Address:Yes / No. By enabling this option, the billing address will be collected in the payment window.
- Allow 'Remember Me':Yes / No. Include the option to remember you for future purchases by setting this option to Yes.
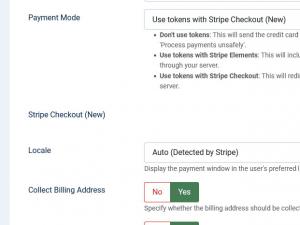
New version
The new version will prompt a set of different fields, such as:
- Locale: Auto (Detected by Stripe) / Site (Joomla! language). The payment window will be displayed in the user's preferred language, if there is any available. By default, English will be used.
- Collect Billing Address:Yes / No. Specify whether the billing address should be collected in the payment window.
- Show Only Card Payments:Yes / No. By setting this to Yes only Card payments are allowed. Set this to No to show all available payment methods eg. iDEAL, Bancontact etc. This is dependent on your Stripe account, payer location and currency.
- Show Line Items:Yes / No. This will show the products as a list (each product with quantities) instead of a whole purchase.
- Cancel URL:Type here the URL where the customer will be directed to if they decide to go back to your website. Leave this blank to default to the form page.
In order to update the payment status, please setup a webhook in your Stripe account for the 'checkout.session.completed' event at this URL: https://your_website/index.php?option=com_rsform&task=plugin&plugin_task=stripe.webhook
How to use the Stripe plugin
After configuring the Stripe parameters from Components > RSForm!Pro > Configuration > Stripe tab, there are some additional steps that needs to be taken in order the payment process to work properly:
Making sure the form is sent to the payment processor
The payment details will only be sent to the Stripe payment processor if the user selects Stripe from the "Choose Payment" field before submitting the form.
The "Choose Payment" field is used in order to allow the users to choose their payment method. It displays the payment methods added to the form in either a Dropdown or Radio Group. It can be shown on the form (allowing the user to select his preferred payment method) or not (forcing the user to pay using the default payment method).
If you are using a single payment method and you need to hide the Choose payment field, this can be achieved by editing the field and setting to "No" the "Show in front-end?" option within the "Attributes" tab.
In order the Stripe payment method to be available within the Choose payment field, the following payment related element has to be part of your form.
- (Payment) Stripe - actual payment related element that will be included within the Choose Payment selection on your form.
Mapping form information to Stripe for card processing
There are two cases when form information needs to be mapped:
- When using Don't use tokens / Use Tokens with Stripe Elements options, Card details as well as Customer Email fields needs to be mapped
- When using Use tokens with Stripe Checkout (Legacy) / Use tokens with Stripe Checkout (New), only the Customer Email field needs to be mapped.
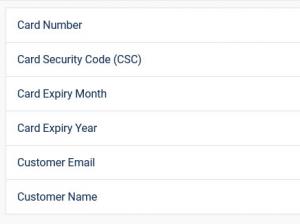
If No Tokens or Tokens with Stripe Elements options are used, in order to collect the user's card information, the following fields needs to be added in the form:
- Card Number - a textbox field used in order the user to fill in the credit card number
- Card Security Code (CSC) - a textbox field used in order the user to fill in the credit card security code
- Card Expiry Month - a dropdown containing month numbers(Ex: 01 for January, 02 for February and so on).
- Card Expiry Year - a dropdown containing years(Format: yyyy, Ex: 2016, 2017)
- Customer Email - a textbox field where the user needs to enter his email address
- Customer Name - a textbox field where the user needs to enter his name
Note: After adding the above-mentioned fields to the form, you need to go to Form Properties > Stripe Configuration tab and map the Stripe fields with the RSForm!Pro fields, in order to be populated automatically with user-supplied data.
These fields requires mapping when No Tokens are used or when using Tokens with Stripe Elements.
If one of the following options is used:
- Use tokens with Stripe Checkout (Legacy)
- Use tokens with Stripe Checkout (New)
Note: when testing Stripe, besides the fact that you'll need a testing Stripe API Key, you'll have to use a testing credit card.
Adding costs
In order to receive funds using RSForm!Pro and Stripe payment plugin, your form needs to include a cost. In order to add costs to your form you can use any of the following fields:
- Single Product - Adds a single product to the form. For this type of field you can set up a caption, description and a price.
- Multiple Products - Adds the ability to display multiple products to be purchased either in a Dropdown or a Checkbox. Its items need to be specified in the following manner: price | label (ex: 15 | T-shirt)
- Quantity - Allows the user to choose the amount of products (simple or multiple).
- Donation - Allows the user to type in the amount to be paid inside a standard Textbox.
- Total - This field is used alongside the Donation, Single and Multiple Products fields. It calculates the total price to be paid.
Modifying Stripe vars through Scripts called after form has been processed
This process is similar to the already existing example regarding the PayPal parameters control. First you will need to get a new instance of the Stripe object, which is done with:
$stripe = RSFormProStripe::getInstance();
Then you can override parameters as follows, depending on your Stripe payment mode.
    //For Stripe Elements or Stripe Checkout Legacy:
    //note that this won't change the legacy popup information, instead this will be applied directly on your order
    $stripe = RSFormProStripe::getInstance();
    $stripe->args['description'] = 'This is a new description.';
    //For Stripe Checkout New:
    $stripe = RSFormProStripe::getInstance();
    $stripe->args['payment_intent_data'] = array('description' => 'my payment description here');
    //For Stripe Checkout New:
    //another example using the metadata parameter where you can add custom [token => value] to your payment.
    //in this example, "first name" or "last name" can be anything you want.
    $stripe = RSFormProStripe::getInstance();
    $metadataArray = ["first name" => "My First Name", "last name" => "My Last Name"];
    $stripe->args['payment_intent_data'] = array('description' => 'my payment description here', 'metadata' => $metadataArray);
If you are using 'Use tokens with Stripe Checkout (New)' you can modify the price, currency or product name by using the following code:
// This is the price received from the form - adjust it to your needs eg. $price = '29.99';
$price = number_format($_POST['form']['rsfp_Total'], 2, '.', '');

// This is the default currency - can be specified manually eg. $currency = 'USD'; or by grabbing it from a field eg. $currency = $_POST['form']['currency-field-name-here'];
$currency = RSFormProHelper::getConfig('payment.currency');

// This is the product showing up in the cart. Can be overridden by using a custom static label eg. 'Custom Purchase'; or by grabbing it from a field eg. $products = $_POST['form']['field-name-here'];
$products = 'Custom Purchase';

$stripe = RSFormProStripe::getInstance();
$stripe->args['line_items'] = array(
  array(
    'price_data' => array(
      'unit_amount' => $price * 100,
      'currency' => RSFormProHelper::getConfig('payment.currency'),
      'product_data' => array(
        'name' => $products
      )
    ),
    'quantity' => 1
  )
);
When using the Stripe Checkout New, you can display all available payment methods (not just credit cards) by using the following script:
$stripe = RSFormProStripe::getInstance();
$stripe->args['payment_method_types'] = array();
The above examples will change the description sent to the payment processor, or add some extra information. For a more detailed list of parameters available in the API you can check the developer documentation: Stripe Elements / Checkout Legacy or Stripe Checkout New.
Version 3.2.5
- Updated - Stripe PHP library updated to 2025-11-17.clover
- Fixed - Product Fields with an empty caption would throw a Stripe error when attempting to redirect.
Version 3.2.4
- Updated - Payments are now sorted in the 'Choose Payment' field according to the same order in the form.
Version 3.2.3
- Fixed - If any of the products had a quantity of 0 and 'Show Line Items' was set to 'Yes' the form was no longer redirected to Stripe.
Version 3.2.2
- Added - Joomla! 5 native compatibility - no longer needs the 'Behaviour - Backward Compatibility' plugin.
Version 3.2.1
- Added - Option to show items one by one as a shopping cart.
- Updated - Plugin requires at least Joomla! 3.9.0 to be installed.
- Fixed - In some cases, when using a tax, the total would contain 3 decimals and could not redirect to the Stripe payment page.
Version 3.2.0
- Updated - API version updated to 2023-10-16 - if you are using custom scripts these might need to be updated.
- Updated - Stripe PHP library updated to 13.2.1
- Updated - Some deprecated code has been removed or reworked.
Version 3.1.3
- Added - Show all available payment methods when 'Show Only Card Payments' is set to 'No' - when using 'Use tokens with Stripe Checkout (New)'.
- Updated - New installs will have 'Use tokens with Stripe Checkout (New)' as this is the recommended mode.
- Fixed - Setting the credit card fields to be required and also mapping them when using 'Use tokens with Stripe Elements' would fail validation at all times.
- Fixed - In some cases when minifying the page contents with RSSeo! a Javascript error could prevent the form to be redirected to Stripe.
Version 3.1.2
- Updated - Compatibility with Payment Package v3.1.3
Version 3.1.1
- Added - Can map 'Customer Name' when 'Payment Mode' is set to 'Use tokens with Stripe Elements'.
Version 3.1.0
- Updated - Payment fields will now be correctly placed in the 'Payment' group.
Version 3.0.2
- Updated - PHP 8.1 compatibility improvements.
- Updated - Stripe library updated to 8.8.0
Version 3.0.1
- Fixed - PHP 8.1 would throw some Deprecated notices.
Version 3.0.0
- Updated - Joomla! 4.0 and RSForm! Pro 3.0 compatibility.
Version 1.1.3
- Updated - Tax can now be shown when selecting this payment method.
Version 1.1.2
- Updated - Stripe library updated to 6.43.0
- Updated - Stripe API version set as 2019-08-14
- Updated - Removed beta parameters since Stripe Checkout is out of beta.
- Updated - Code improvements.
Version 1.1.1
- Fixed - Can override parameters by using RSFormProStripe::getInstance().
Version 1.1.0
- Added - Stripe New Checkout integration (supports 3DSecure).
- Added - Stripe Checkout integration.
- Updated - Stripe library updated to 6.31.3
- Updated - Code improvements.
Version 1.0.5
- Added - {_TRANSACTION_ID:value} placeholder.
- Added - Payment icon for the Stripe payment.
- Fixed - {grandtotal} and {tax} placeholders now format the values according to the payment format settings.
Version 1.0.4
- Fixed - Total amount with tax was not correctly calculated.
- Fixed - Card Code was not correctly mapped when using Tokens.
Version 1.0.3
- Added - 'Use Tokens' option in the configuration.
Version 1.0.2
- Updated - Some validations are now running before attempting a payment.
Version 1.0.1
- Updated - 'Customer Email' can e mapped.
- Updated - Success message also specifies amount paid.
Initial Release
29 persons found this article helpful.


