 The new Constant Contact plugin released today joins the other two RSForm!Pro email integrations: MailChimp and RSMail!
Basically, the plugin allows you to integrate your custom newsletter forms with the email-marketing manager, by passing the users data to your Constant Contact account and assign them to the configured lists.
Requirements
- RSForm!/Pro 1.3.0 rev. 30, at least
- an active Constant Contact account
- the RSForm!Pro - Constant Contact plugin
How to use it?
Step 1: Download the Constant Contact plugin
Access your RSJoomla! account and download the Constant Contact plugin from Resources >> Customer Downloads >> RSForm!Pro membership >> Downloads >> Plugins >> Constant Contact plugin
Step 2: Install the Constant Contact plugin
The Constant Contact plugin installs trough the default Joomla! installer.
In the backend Joomla! panel, head to Extensions >> Install/Uninstall and upload the plg_constantcontact.zip package
Step 3: Configure the Constant Contact plugin
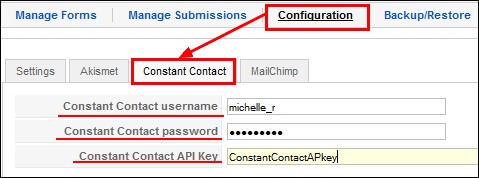
Once you have installed the plugin, head to the RSForm!Pro "Configuration" tab and add your Constant Contact account details. Besides the username and password, you'll also need the Constant Contact API key, which can be received from the Constant Contact community website.
Step 4: Create the subscription form
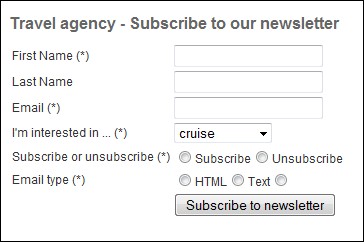
Suppose that on your travel agency website, you have a custom subscription form that allows you to collect the subscriber's data and assigns them to your Constant Contact list.
In our example, we've used 3 textboxes for the subscriber first name, last name and email, a dropdown for its interests (the user can choose to receive newsletters according to their vacation interests: cruise, honeymoon or 55+) and 2 radio groups for the Subscribe/Unsubscribe option and email type (HTML or text).
Step 5: Create the Constant Contact list
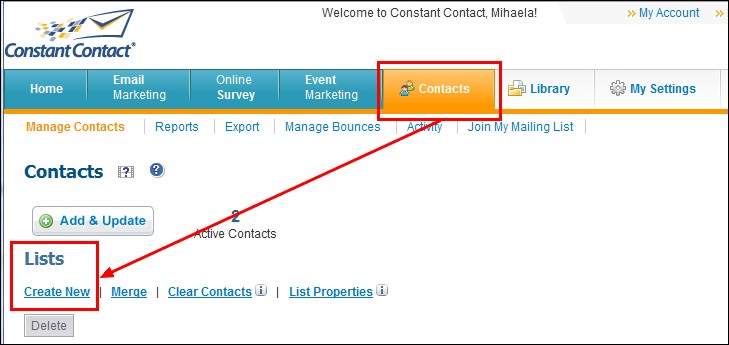
Users that are signing up to receive newsletters from the travel agency will be assigned to a preconfigured Constant Contact list.
To create a new subscribers list, access your Constant Contact account and create a new list from the "Contacts" tab, as shown in the screenshot below.
Step 6: Map the form fields with the Constant Contact list
Once you have configured the plugin, head to the "Manage forms" tab, edit the subscribing form and enable the Constant Contact integration.
While you are here, choose the subscribing options: users can be automatically subscribed/unsubscribed from the newsletter. A 3rd option allows users to decide whether they want to subscribe to newsletter or unsubscribed from the mailing list. If you choose the "let the user decide option" you will have to specify a field that will contain the following values: subscribe and unsubscribe.
Notice that the chosen subscribing value will be assigned to the corresponding Constant Contact list field.
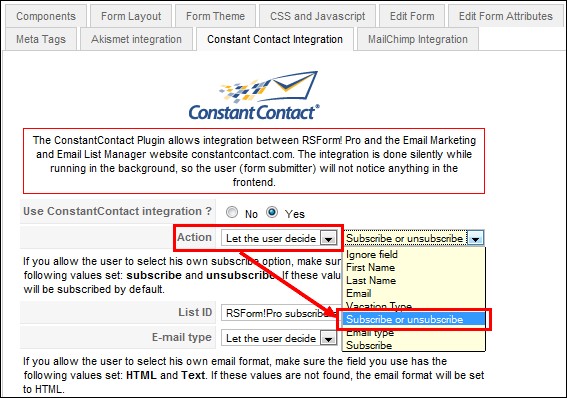
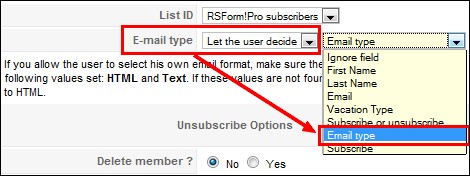
Next step is to select the Constant Contact subscribers list that we've previously created and choose the email type subscribers option.

In case you allow subscribers to choose the email type, you'll need to specify the email form field. Notice that the chosen email type will be assigned to the corresponding Constant Contact list field ("email format").
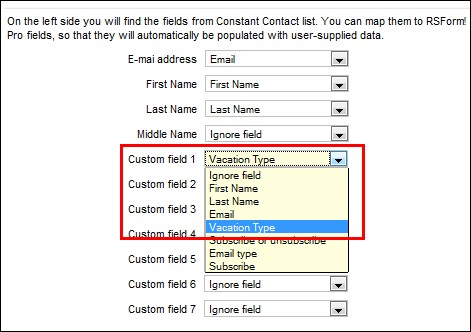
Now, map the RSForm!Pro fields with the corresponding Constant Contact list fields: email, first, last name and so on. The additional form fields can be assigned to the Constant Contact custom fields, as shown below:
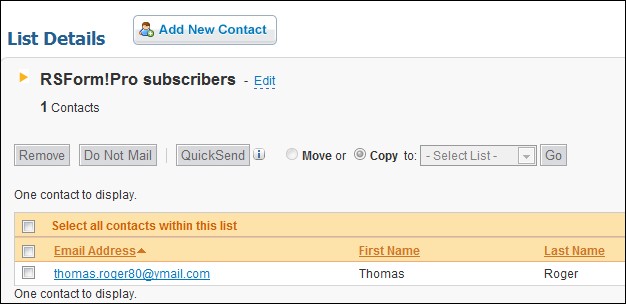
After the form submission, user details are passed to the Constant Contact list and assigned to the mapped fields. The subscriber receives a notification email from Constant Contact.
Watch the video tutorial
Ep. 57: RSForm!Pro Constant Contact Integration
Besides the Constant Contact plugin, we've also released an integration with the popular spam prevention system, Akismet.
You can read more about the RSForm!Pro Akismet plugin here or watch our video tutorial:
Ep. 58: RSForm!Pro integration with Akismet

