In this guide we will demonstrate how to swiftly add a new event using the Event Creation Modal!
Introduction
Managing events can be complex, but with our streamlined event creation modal, you can quickly add new events in just a few clicks. The modal offers a range of configurable options to ensure you have everything you need to set up an event.
Here’s a step-by-step guide to rapidly adding a new event.

+ Add Event
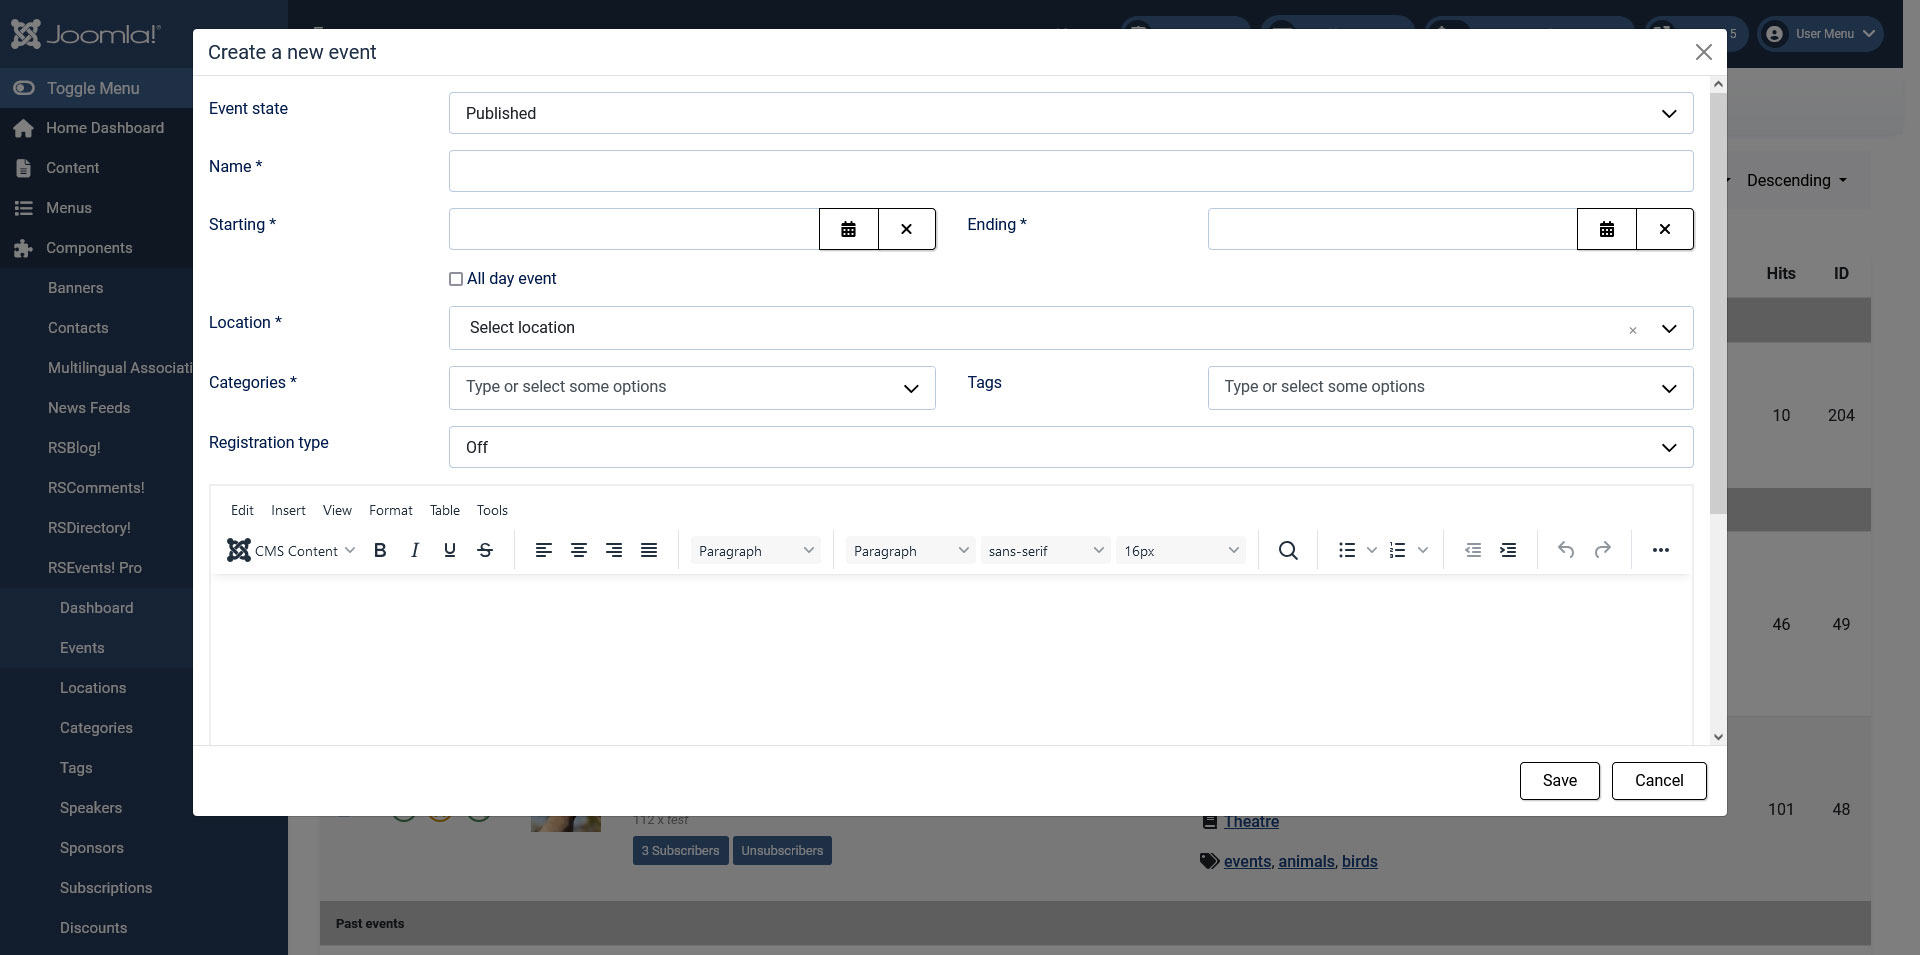
Go to Components > RSEvents!Pro > Events > Click on 'Add Event' button, a modal will be revealed with the following configuration options:
1. Event State
When adding a new event, the Event State dropdown allows you to control the visibility and status of the event. Here are the four options available:
- Published: Select this when your event is finalized and ready to be visible to attendees. Once published, people can view and register for the event.
- Unpublished: Use this option if the event is still in progress or if you’re not ready for it to be public yet. The event will be saved, but it won't be visible to attendees.
- Archived: For past events or those that are no longer relevant, archiving the event allows you to keep a record without it being displayed. This is useful for retaining event details without cluttering your active event list.
- Canceled: If the event is no longer happening, select this option to mark it as canceled. This will make it clear to attendees that the event will not take place.
By selecting the appropriate event state, you can effectively manage the event’s visibility and lifecycle.
2. Event Name
The Event Name field is required and will serve as the title of your event. This is one of the most important fields, so be sure to create a name that accurately reflects the event.
Make sure to:
- Be descriptive but concise.
- Use keywords that attendees might search for.
This field has real-time validation to ensure the name is entered correctly before proceeding.
3. Starting and Ending
The modal includes both Start and End date-time fields, allowing you to schedule your event precisely. Here’s how to configure these:
- Starting: Use the date and time pickers to set when the event begins. This is a required field.
- Ending: Select the date and time when the event will end. You can easily match this with the starting date if your event ends on the same day.
If your event spans the entire day, check the All-day event box. When enabled, the time fields will be automatically hidden, simplifying the process.
4. Location
The Location field ensures that your attendees know where to go. There is one way to configure this:
- Select location: If your platform has a set of predefined locations, use the dropdown to select one.
5. Categories
To help organize and classify your event, use the Categories field. This is particularly useful for larger event calendars or systems with many types of events.
- Choose from predefined categories such as “Conference,” “Workshop,” “Webinar,” or any that best suit your event.
- Multiple categories can be selected to provide better filtering options for attendees.
6. Tags
In addition to categories, Tags can help further refine and describe your event. Tags are helpful for searching and categorizing events based on specific topics or themes. For example, a tech conference might include tags like “AI,” “Cybersecurity,” and “Startups.”
You can either select from existing tags or create new ones by typing in the field.
7. Registration Type
Next, choose the Registration Type based on how you want attendees to sign up for the event. There are three options:
- Off: Use this option if no registration is required. Perfect for open events where attendees don’t need to RSVP or purchase tickets.
- Ticket Based: For events that require a ticket for entry, this option allows you to manage ticket sales directly within the modal. You can:
- Add New Tickets: Create different types of tickets, such as Early Bird, VIP, or General Admission, each with their own price points and availability.
- Manage Quantity and Pricing: Set the number of tickets available and their respective prices.
- RSVP Based: For free or invitation-only events, use the RSVP option to track attendance. This lets attendees confirm their participation without needing to purchase a ticket.
Each registration type serves different event needs, so choose the one that best fits your event’s setup.
8. Event Description
The Event Description area allows you to provide detailed information about your event. This is your chance to give attendees a clear idea of what to expect.
- Provide an overview of the event’s purpose and key highlights.
- Mention important details like agenda, speakers, or topics covered.
- Add additional instructions, such as dress code, materials to bring, or links to further resources.
Final Steps: Save and Launch
Once you’ve filled in all the required fields and configured your event details, simply click Save at the bottom of the modal. If your event is ready to go live, select Published under the event state. Otherwise, you can save it as a draft to revisit later.
If at any point you need to cancel, simply click Cancel to discard the changes.
For more information on how to use RSEvents!Pro, please refer to the online docs:
RSEvents!Pro DocumentationIf you have any questions regarding this functionality or if you require assistance with your form please use the following button to submit a ticket to our team.
Submit a ticket
